
The Affair at Dranesville: A Tactical Clash in Virginia
The engagement at Dranesville was a sharp military encounter characterized by sudden movements and tactical positioning. Occurring at the intersection of two vital roadways, the battle pitted Union forces under General Ord against Confederate cavalry and infantry led by J.E.B. Stuart.
The Opening Maneuvers
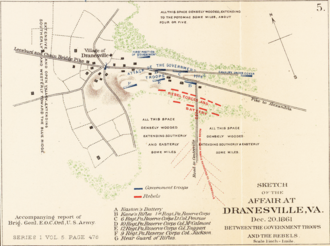
The conflict began around noon when General Ord arrived at the junction of the Georgetown Pike and Leesburg Pike in the village of Dranesville. Upon arrival, Union forces quickly drove off the Confederate advance cavalry pickets—small detachments sent ahead to provide early warning of enemy movement. Following this initial success, Ord led his command westward along the Leesburg Pike.
By approximately 1 p.m., J.E.B. Stuart approached Dranesville from the south with the main body of his force, bringing him into direct contact with the rear of the Union detachment.
Tactical Deployment and Engagement
Reacting quickly to the threat, General Ord halted his infantry and wheeled them around to form a defensive line on the north side of the Leesburg Pike. To bolster this position, he deployed his artillery on a nearby eminence, or elevated piece of land, providing a strategic vantage point over the battlefield.
Stuart countered by deploying his infantry on the south side of the pike, placing his artillery approximately 300 yards south of the Union position. The engagement began with a case of mistaken identity: the 1st Kentucky, believing the 6th South Carolina were Union troops, opened fire. The Carolinians immediately returned the fire, signaling the start of the general engagement.
Infantry Assaults and Casualties
The 11th Virginia advanced toward the Union line, supported by the 10th Alabama. However, they were halted by heavy Union fire. The leadership of the 10th Alabama suffered significant losses during this push; Colonel John Forney was wounded, and Lieutenant Colonel James B. Martin was killed.
In response to the gunfire, the 9th Pennsylvania Reserve Regiment launched a charge across the turnpike, but they were swiftly driven back by the opposing force.
The Artillery Duel and Conclusion
As the infantry struggled, the artillery units began a duel. Due to the superior strength of the Union position on the eminence, the Confederate guns were quickly knocked out of action. General Ord then deployed his infantry in a skirmish line—a loose formation used to harass the enemy and probe defenses—and sent them across the pike toward Stuart.
The two forces remained squared off for nearly two hours. At 3 p.m., having ensured that his wagons were safely away and secure from capture, Stuart ordered a withdrawal. General Ord pursued the retreating forces for half a mile to secure his own line of retreat before breaking off the attack and returning to Langley.
While Stuart returned to the area with reinforcements the following day, the battle had already concluded.
Key Facts
- Location: Intersection of Georgetown Pike and Leesburg Pike, Dranesville, Virginia.
- Union Commander: General Ord.
- Confederate Commander: J.E.B. Stuart.
- Key Union Units: 1st Kentucky, 9th Pennsylvania Reserve Regiment.
- Key Confederate Units: 6th South Carolina, 11th Virginia, 10th Alabama.
- Outcome: Confederate withdrawal after the loss of artillery and securing of wagons.
| Detail | Union Force | Confederate Force |
|---|---|---|
| Commanding Officer | General Ord | J.E.B. Stuart |
| Positioning | North side of Leesburg Pike | South side of Leesburg Pike |
| Artillery Status | Held high ground (eminence) | Knocked out during duel |
| Primary Objective | Defend intersection/Pursue enemy | Protect wagons/Advance north |
Frequently Asked Questions
What caused the initial firing at the Battle of Dranesville?
The fighting began when the 1st Kentucky mistook the 6th South Carolina for Union troops and opened fire, which was then returned by the Confederate soldiers.
Why was the Union artillery more successful than the Confederate artillery?
The Union artillery was positioned on an eminence, providing a tactical advantage that allowed them to knock out the Confederate guns.
Who were the primary casualties among the Confederate leadership?
The 10th Alabama suffered the loss of Lieutenant Colonel James B. Martin, who was killed, and Colonel John Forney, who was wounded.
Why did J.E.B. Stuart order a withdrawal at 3 p.m.?
Stuart ordered the withdrawal once his wagons were safely away and no longer at risk of being captured by Union forces.
Did the battle continue the following day?
No. Although Stuart returned to the site with reinforcements the next day, the battle had already ended.